By Ralph M. Lermayer
There is a surprisingly large number of people with eye complications, the kind of problems that make the act of shooting a rifle awkward or near impossible. The most commonly affected shooters are those who are right-handed but left-eye dominant. Although these shooters instinctively mount a rifle or shotgun to the right shoulder, their left eye is the dominant, clearer or only sighting option.
When they mount a gun to the right shoulder, they can’t get a clear picture through the sights or scope with the right eye. For most, the only choice has been to switch to left-handed, but for a naturally right-handed person, the act of shooting from the port side is awkward, unnatural and slow. It doesn’t feel right, doesn’t come to battery quickly, and working the trigger with the left hand is not as controlled as with the right. It simply feels wrong and, consequently, people so afflicted usually just give up shooting.
After 30 some-odd years as a professional gun writer, shooter and one who hunts worldwide and shoots for a living all year, a wood-splitting accident placed me in exactly that position. Vision in my right eye became too blurry to accurately see and place a crosshair, but giving up shooting was not an option.
I’m a pretty fair left-handed shooter. As a varmint hunter, I’d trained myself to shift and shoot southpaw when a target showed up on my weak side. However, it was a compromise, never as fast or as natural as throwing a gun to my right shoulder. I had to find a way to shoot from my right side, yet use my left eye.
It took a bit of trial and error, but I solved the problem. Now, I can mount and shoulder a gun to my proper side and sight with my left eye just as fast as I ever could, with the added benefit of being a bit more accurate.
For those so afflicted, we’ll share two methods to solve the problem. One, my preferred, requires modifying the stock. The second is a simple add-on that will make any rifle work.
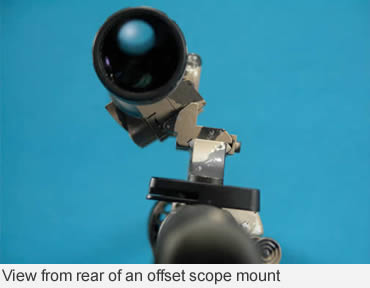
The Crossover
Most wooden stocks on right-hand guns are designed to bring the right eye in line with the sights. Cheekpieces and combs are raised or elevated to hold that eye on an axis over the bore. On such a setup, you simply can’t see through the scope if you try to roll over and use the left eye. You get a partial picture or no picture at all.
The solution? Drop the comb and cheekpiece. Remove enough wood so that when you place your right cheek on the stock, it is your left eye that drops into alignment position with the scope.
As I’ve discovered, this is a relatively simple and quick modification. On most stocks, it means removing a lot of material, nearly 1 1/2 to 2 inches, to create a dished-out area. This dish may look a bit odd, but will result in instant acquisition and a cheek weld that you will discover to be far more consistent and accurate than a normal cheek position.
The Process
It is important to stress that you won’t be removing any material from the butt end. From the recoil pad and 1/2 to 3/4 of an inch toward the receiver, you need to leave everything intact so that you have full shoulder contact to absorb recoil. The recoil or buttplate are attached as always.
Likewise, from about 1 inch behind the pistol-grip section, leave everything as is. You are only removing material and creating a deep dish in the center of the stock.
The best tool to do this is a pair of coarse SureForm wood rasps. The larger unit is about a foot long, has handles like an old carpenter’s plane, and a removable blade. The second, smaller tool is the Termite, made by the same company. It’s a one-handle unit about 3 inches long. Both tools are available at any Home Depot, Lowes or any well-stocked hardware store.
On conventional stocks without a raised comb or high rollover cheekpiece, the little one does a fine job by itself. With a lot of material to remove, the bigger unit is simply faster.
Lock the stock in a vise or padded wood cradle and go at it aggressively. A strip of masking tape on the front and rear will keep you from going too far. Yes, you will be tearing up the finish, but that will be easily cleaned up later.
Once you’ve removed the high comb or rollover with the large rasp, start using the smaller Termite to create the dish. You’re not just working the top end; you need to remove material from the sides as well. Remember, you’re creating an inverted circle, a rounded, dished area.
Continue removing wood and trying the rifle until the left eye drops perfectly in line with the scope or sights. When you have it perfect, put the coarse rasps away. With a series of coarse, medium and fine sandpaper, smooth the stock into final preparation for refinishing.
I won’t go into a detailed stock-refinishing diatribe here; that’s an article in itself. But I will touch on some details. Stock-refinishing kits are available from Birchwood Casey, and Brownells offers pages of stains and oils to perfectly match the original finish.
On a walnut or laminated stock, only an oil finish is needed. If your stock is birch or aspen stained to look like walnut, you will need to stain the raw wood first. Personally, on most of my stocks, I simply ship them off for a total aftermarket camo job after I modify them. I like that look and don’t have to mess with a refinish. On the laminates, a simple oil rub makes this area a near-perfect match. Laminated stocks are by far the easiest to modify.
The Hollow Stock
In order to shave weight, some wooden stocks have a hollowed-out buttstock. The Remington Model Seven, Winchester Model 70 Featherweight and most other shotguns wear a hollowed-out buttstock. As you remove material, you are going to expose that hole. Don’t be concerned.
Continue to remove material (enlarging the hole), until you have the fit perfect. Then, buy a wooden dowel that fits the radius inside the butt (you need to remove the recoil pad or buttplate here). Cut the dowel until it fits fully inside the stock and doesn’t interfere with replacing the buttpad.
Coat the dowel liberally with any good epoxy, set it inside so it fills the hole, wad something inside to hold it in place, turn it upside down and let it dry at least 24 hours. Then, reshape the exposed new dowel wood, and finally sand it. This usually leaves two different wood colors exposed, making a perfect finish match a chore. If you can’t live with that, send it off to Bell & Carlson and have it camouflaged.
Composite Stocks
I’ve made the above modification to fiberglass stocks. The end result is the same, but it is far more complicated. You need to go to your mart or auto parts store and buy a fiberglass repair kit. It’s sloppy and messy, but it can be done. They are thin-walled and hollow, so you must lay in and form a sheet of epoxy-soaked fiberglass cloth. You’re far better off just buying an unfinished drop-in walnut replacement from Boyd’s, Brownells or Bell & Carlson and modifying it. Save the fiberglass stock in case you ever sell the rifle.
Once you’ve made the modifications, simply mount your gun and everything will line up where it should. You’ll find the dished-out area locks your head and eye into perfect position fast, and the cheek weld is dead-on every time. On shotguns so modified, that silly business of raising my head is a thing of the past. My trap and skeet scores have actually improved. The series of photos are far more descriptive than are these words. If you have this vision problem, try this on a cheaper rifle first. After you’ve done one, you’ll be wearing out rasp blades because you’ll soon modify every rifle and shotgun you own.
The Non-Cutting Option
Some rifles, for mechanical, sentimental or other reasons, aren’t candidates for a stock shave. The AR is one such gun, and interestingly, it is that rifle’s popularity that has brought us the non-cutting solution. Because of the need to hang all manners of extra goodies from backup optics to flashlights on the AR frame, the Picatinny rail was developed. This is just a multi-slotted, Weaver-style base that is found all over the AR. With this rail and the huge number of aftermarket blocks designed to mount to it, you can position a second optic, a scope, a close-quarters red dot or a night light, off to the side.
These blocks also fit on a set of standard Weaver-style bases that are available for any rifle. Angular blocks that raise an optic and hold it at 45 degrees off to the side simply clamp to your rifle’s normal scope bases. Then, you merely place the matching Weaver, Warne, Leupold or similar rings to the offset blocks.
The result? The scope now sits off to the left where it drops into perfect alignment with your left eye without having to shave anything at all off your buttstock. These blocks and rails come in different heights and are available from Bushmaster or Brownells. With them, any rifle, any scope, no problem — just hang it off the left side.
With the side mount, you must be aware that there will be a slight shift in the bullet path and normal point of impact at long range. Your bullet path is technically crossing from left to right, as well as normally dropping. I offset this on my rifles so equipped by simply zeroing to strike a half-inch to the left as well as a bit high at 100 yards. At 200, I’m still a tad high and dead-on, and at 300, I’m just a half-inch to the right. In the real world, I would be a bit farther right at 400, but who cares? I rarely shoot at game much over 250, and in the field, it’s still point and shoot.
If you’ve been plagued with wrong-eye-itis, you no longer need be the odd man out. With these quick fixes, whether you choose to shave it off or bolt it on, you’re back in the game.
This article was published in the December 2007 edition of Buckmasters GunHunter Magazine. Subscribe today to have GunHunter delivered to your home.